Nalbinding socks
 |
|
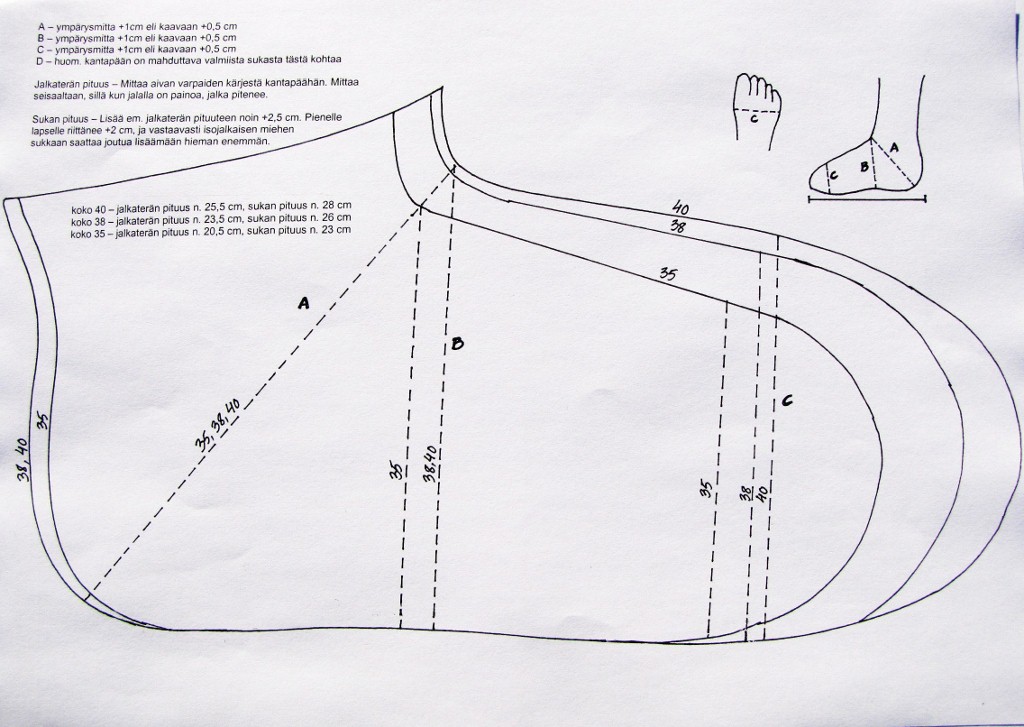
Outline-pattern for nalbound socks
|
It is difficult to give exact stitch-by-stitch patterns for nalbound items because many things affect the result: yarn, stitch type, and personal gauge. An easier approach is working with measurements instead (centimeters or inches), or comparing the mitten-to-be to an old mitten or an outline-pattern.
Outline-patterns for nalbound socks (link) (pdf),
in three different sizes:
small women's (European 35, foot length 20.5 cm)
medium women's (Eur 38, foot length 23.5 cm)
large women's (Eur 40, foot length 25.5 cm)
You an use these outline-patterns or draw your own. In these patterns there is a 2.5 cm allowance for length, ie sock length = foot length + 2.5 cm.
If you are using these patterns, please check the lenght and width, too, since feet come in many sizes.
Wikipedia helps with translating shoe sizes, see the colourful plates at the bottom, and the red stripe.
Naturally you can nalbind sock withouth a pattern, too, simply by trying the sock on after every couple of rows.
Socks can be nalbound from ankle to toe, or from toe to ankle, and there are also several ways of constructing the heel, which I think Shelagh Lewins's site shows best (link).
For drawing your own pattern, you need these measurements:
(A) - around heel - front of the ankle
(B) - around the highest spot of the foot instep
(C) - around the base of the toes, the widest spot
- and length of the foot
The length of the foot (from the outmost toe tip till the outer edge of the heel) is best taken with the person standing on both feet because the feet elongate a bit when there's weigth on feet. Add +2.5 cm to that measure. For small children's socks +2 cm may be enough, and respectively for large men's socks you may need to add more than +2.5 cm.
Draw a horizontal line, the foot lenght + 2.5 cm. Sketch the heel arch, and draw another line in 45 degree angle (A measure, from heelt to front ankle). Divide A measure by two, and add +0.5 cm for allowance. The draw a vertical line (B measure). Divide B measure by two, and add +0.5 cm for allowance. Sketch the arch of the toe part, and check the width (B and C measure; Divide measure C by two, and add +0.5 cm). The cuff opening needs to be large enough for the heel to fit through (ie you can use A measure).
Using these allowances, ie +1 cm in the circumference (+0.5 cm in the flat pattern), your finger fits between the measurement tape and your foot, and another thin sock should fit under the woollen one. If you don't want to wear anything under the woollen socks, you can leave the allowances a bit smaller.
If the yarn you are using, felts and shrinks when washed, you can make a swatch, measure it, wash it and let dry, measure again, and calculate how much it shrank. Then you can estimate how much allowance you should leave for your socks. A dense fabric shrinks less than a fabric made of loose stitches.
Nalbound socks made from ankle to toe - The cuff part
If you start nalbinding your socks from the ankle, made the first chain of stitches, foundation row, long enough so that it can be slipped past the heel (the widest part) easily without stretching. Often the first row 'pulls together' and becomes smaller when there are two or three rows made.
Do the cuff part for the length you prefer, and then leave a slit (opening) for the heel, just over half of the sock width. The heel opening can be made in a similar way as the thumb opening (link). The width of the heel opening is just over half of the sock width, "half + a couple of stitches at each end of the slit". It is good to check the sock width at this point, ie the same point where you have the decreases at sides in a knitted sock, too. If necessary, you can decrease for example 1-2 stitches at both sides of the sock, in 1-3 rows. Continue nalbinding the foot part, and check the width from time to time.
I recommend doing the heel before finishing the toe part because the heel cup size and shape affects the final size of the sock, so when you make the heel first, you still can adjust the sock size when nalbinding the toe part.
Heel
There are many ways to do the heel for your nalbound socks. You'll get some ideas on Shelagh Lewins's site (link), and here's the construction for the Swedish Klas-Brita socks (link).
You can make the heel in a similar way as the thumb: Leave a slit (opening) for the heel, just over half of the sock width, and do the heel afterwards. The heel can be started like the thumb (link), and then continued in spiral. In the first row or two it is probably not necessary to decrease in the corners, but the number of decreases needed depends on the yarn thickness, stitch type, and sock size. After the first row or two you could try decreasing four stitches in each corner. Imagine a line in the corner, and decrease symmetrically on both sides of that invisible line, to avoid the heel cup becoming misshapen. After a couple of row, you can probably decrase more, 5-7 stitches in each corner. Try on the sock often enough!
When there's only about 4 cm hole left, decrease in every stitch (unless your yarn is thin and/or the stitch height is shallow, in which case the hole should be a bit smaller before decreasing in every stitch).
If the heel up is too shallow, the sock feels too tight at the highest spot of the instep. Undo or cut off a few rows, and decrease less in the corners this time. I'd also recommend doing the heel cup before the toe part.
Keep on decreasing until it is difficult to pick up the stitches, or the opening is only about the size of a finger tip. Pull the last few stitches small carefully by hand in order to avoid loose loops. Either sew the gap closed with a couple of stitches, or insert the needle (a thin darning needle works better) through all the last loops, and then pull the yarn to close the gap, and secure with a couple of stitches. Hide the yarn onto the reverse side by weaving it into the loops there.
Nalbound socks made from ankle to toe - The toe part
I'd recommend doing the heel first, and then the toe part. Nalbind till the little toe is covered, and then start decreasing. Again, it depends on the yarn thickness and stitch row height, how quickly the toe part closes up. If the row height is shallow, try decreasing in every second stitch, and if the row height is tall, decreasing in every stitch may work.
Keep on decreasing until it is difficult to pick up the stitches, or the opening is only about the size of a finger tip. Pull the last few stitches small carefully by hand in order to avoid loose loops. Either sew the gap closed with a couple of stitches, or insert the needle (a thin darning needle works better) through all the last loops, and then pull the yarn to close the gap, and secure with a couple of stitches. Hide the yarn onto the reverse side by weaving it into the loops there.
If the toe part closes up too fast, and the sock is too short, undo or cut off a few rows, and try decreasing less this time.
Nalbound socks made toe up
If you start nalbinding socks from toe towards ankle, increase little by little while approaching the heel. Try the sock on often enough!
Leave on opening for the heel, and do the cuff. Remember to try the sock on every once in a while because the the shape and size of the heel cup affects the final size of the sock.
In Finland, when knitting with five needles gained more popularity, it was still common in some areas to nalbind the foot part for the sock, and knit the cuff.
|

