

How to make nalbound mittens Top Down,
|
 |
|
Video G |
A round top mitten is usually started by making a large loop, into which the next stitches are made. Below a list of video links for making the first loops - personally I think the video C shows a quickest and easiest way to start - and the instructions for mittens continue below the video links...
Video A, First stitches with Danish Stitch, then with Finnish Stitch 2+2 (link)
Video B, two-coloured, first with Danish Stitch, then Finnish Stitch 1+1 (Oslo Stitch) (link)
Video C, create/cast on the stitches like when knitting, then Finnish Stitch 1+1 (Oslo Stitch) (link)
Video D, Finnish Stitch 1+2 (Mammen Stitch) (link)
 |
|
Video D |
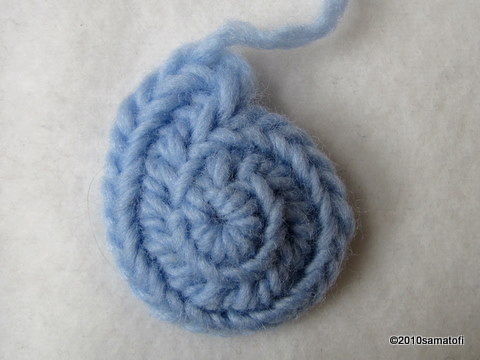
Video E, Crochet a circle, then Finnish Stitch 1+1 (Oslo Stitch) (link)
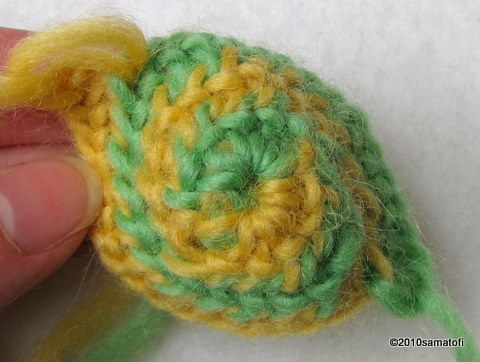
Video F, two-coloured, Finnish Stitch 1+1 (Oslo Stitch), how to add second colour (linkk
Video G, two-coloured, Finnish Stitch 2+2, how to add second colour (link)
Video H, First stitches with York Stitch, then Finnish Stitch 2+2 (Aili Kuronen's way) (link)
How to increase stitches when making a round start, that's explained on "Video H" (link)
Finnish Stitch 2+2, longer video (link)
Åsle Stitch (link)
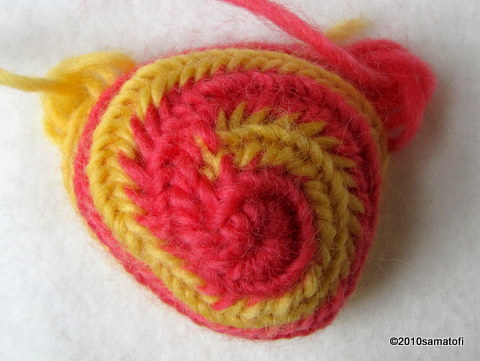
Rosette
 |
|
Video B |
Once you have made the large loop, you'll start making the stitches into it. With thick yarn some 8 stitches may be enough, and with thin yarn some 15 or even more. If there are too few loops in the rosette, you'll notice the edges don't meet that easily when you pull the yarn to close the rosette. In such case there may be a small bumb in the center. If there are too many loops, there may be a hole in the center of the rosette, or the edges may seem ruffled. If either happens, loosen the rosette, and either add or undo a couple of stitches.
Once you have made the rosette, you can continue with whatever stitch type you prefer.
Increasing - (link)
On the first actual row you'll start increasing. On the first row, increase in every stitch, so the number of stitches doubles. On the second row increase in every second stitch, and on the third row in every third, or as needed. The number of increases needed depends on the yarn thickness and the size of the mitten. With thick yarn some 45 stitches may be enough for a mitten, but with thin yarn you may need 80, or even more.
To make the increasing easier, you can sketch an outline pattern onto paper, and compare your mitten to the pattern, or to an old mitten.
Another option is to make first a chain of stitches (a foundation row) which is long enough to run around your hand (not too tight, not too loose), and count the stitches. With your round top, simply keep on increasing until the stitch count is the same as in the chain of stitches you made as a test piece. Nalbound fabrics tend rather to stretch lengtwise and narrow widewise in use, which is good to keep in mind when you are estimating the width and length of your mittens.
Nalbind both mittens or socks simultaneously
You will easier get a pair of symmetric mittens or socks when you make both mittens (or socks) at the same time, for example a couple of rows at a time, or one length of yarn at a time. Count the stitches in both foundation rows (the first chain of stitches), to make sure your pair will be of same size. In thin yarns a difference of a stitch or two will not really show, but in a thicker yarn you will see and feel the difference if one item has more loops than its pair.
Keep on nalbinding till the thumb web (place for thumb opening), and check every now and then whether your mittens need increasing already before the thumb.
Thumb opening
In mittens knitted with five needles you'll leave a separate piece of yarn to mark the thumb opening, and you'll undo that spot later to start the thumb. In nalbound mittens, however, you'll simply leave an opening, by not connecting the new stitches to the previous row.
The size of the thumb opening can be estimated by eyeballing. In women's mitten a 4 cm wide opening is usually enough, depending on the yarn. With thin yarn the opening can be a bit narrower than with thick yarn. For children's mittens make a bit smaller opening, and for men's mittens a wider one.
The opening forms when you leave the new stitches unconnected to the previous row (compare to making the first chain of stitches). At the other end of the opening the stitches are again connected to the previous row
Before connecting the chain of stitches to the previous row again, check the width of the mitten. Quite probably you can make the mitten a bit wider at this point because the widest part needs to be below the thumb opening. The widening happens easily, if you make the chain of stitches e.g. 2-3 stitches longer than the previous row above is, that is, there will be less stitches on the bottom side (cuff side) of the thumb opening than at the upper side (finger side). The 'lengthening' depends on the yarn thickness, and how wide your mitten top part is. After connecting the chain of stitches to the previous row again, the chain of stitches will be a bit looser than the top part of the mitten.
Cuff
Continue nalbinding until the cuff part is of suitable length, the way you prefer it.
The cuff part can be straight (about equally wide all through), a bit widening (mitten is wedge-shaped or A-shaped), or bell-shaped (widening more strongly). In the bell-shaped mittens, you can first decrease a bit below the thumb, and then start increasing. The decreasing below the thumb help the mitten to stay better on the hand, ie not fall off so easily, and also highlight the bell shape of the cuff. An outline-pattern may help when nalbinding a bell-shaped cuff.
Last row - how to finish off the last stitches
Video (link)
When you are finishing off the edge, you can first start by pulling the stitches smaller, and at the same time gradually pick up less loops behind the thumb, and the ones you have around the thumb (if you have more than one).
If you have tensioned the new stitches around your thumb, you can pull them smaller by tensioning them around the thumb nail/tip. When the stitches become so small the thumb loop does not fit around your thumb anymore, you can insert the needle through the stitches without thumb loop(s) (flat). Do a couple of those smaller stitches.
If your stitch has been e.g. Finnish Stitch 1+3 (Brodén Stitch), you can gradually pick up less loops behind the thumb. First, go with FS 1+2 (Mammen Stitch), do a couple of them. Then do FS 1+1 (Oslo Stitch), and do of couple of them, too. Then do FS 1+0 (ie 1 thumb loop, but no loops onto needle behind thumb), do a couple of them, and finally do a couple of stitches, like you were simply sewing by hand around the edge of the fabric.
In order to get a 'gently sloping' edge, do the finishing off little by little, during several stitches, and often it is good to make two or three stitches before you change the stitch (ie pick up less loops behind). At the end, you can pull the last few stitches (FS 1+0) smaller by pulling the yarn by hand (see the video), and finally 'sew' over the edge of the cuff a couple of times. Hide the yarn on the reverse side by weaving it into the loops there.